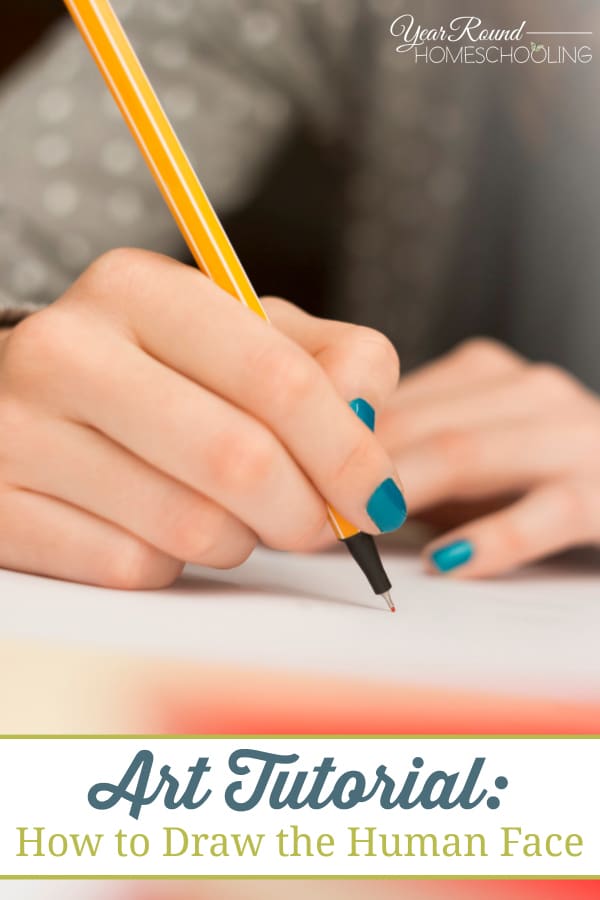
Welcome again, to another art tutorial. A month or two ago, we went through the process of drawing a battle-scarred cat using digital media. This week, we’re switching gears and using traditional methods to draw the human face. In my opinion, this is the hardest thing you will learn, though it is the best way to progress in your artistry.
Today you will need the following art supplies:
Graphite pencils—any normal, day to day pencil will work, but if you’re a little more into the technical aspects of pencils, try and find a 2B, 4B, and 6B pencil for this project.
An eraser (preferably a kneaded eraser, but any will do).
Printer paper or a sketchbook. If you use printer paper, make sure you are working at a flat, smooth surface.
Patience…and sanity. Yes, these are things you will need today, for it is all too easy to get frustrated with your own work. Do not be discouraged if your drawing is slightly altered, or if you cannot get a certain aspect perfectly drawn. Every artist draws in his or her own time, and even the most skilled artists will not draw a picture EXACTLY as shown. So, do your best, and be proud of yourself for whatever you accomplish!
You have your supplies gathered? Well then, we can begin with the, *ahem*, “subject” we will be drawing. Rather than scrounging around Google for free images of faces to draw, I decided to use a face that is not going to get me into trouble for using the wrong image. That face, is my face, the only face I know is mine and yes, we are going to draw it. Yay! Here is the image we will be working from:
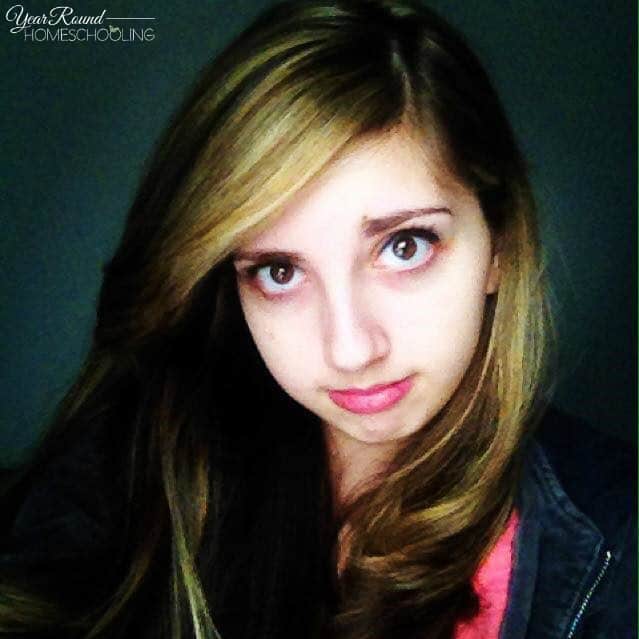
For drawing purposes, at least for learning the basics of drawing the human face, you should always try to find a mostly neutral face. Toothy smiles are great, but they are a pain in the neck to draw correctly. Keep in mind, as we move through, that it is perfectly fine to add alterations to the drawing if you want or need to.
Step 1
Start off with your 2B pencil.
The first thing you need to do is study the photo. Look at the subject’s face and pick out what shapes you see. (Remember? We did this when drawing the cat as well.) Drawing, after all, is only finding the shapes in life and piecing them together.
We will start with the two shapes you should be able to pick out right away. For the head, we have a circle, then a big U shape for the chin–and for the small portion of neck that we can see, we have a triangle. Do not worry about getting anything else right now; just draw your oval and your triangle. Your drawing, at this point, should look like this simple sketch below.

Step 2
In this next step, I want you to first draw a line down the middle of the circle/U-shape you’ve drawn, from the top of the head to the middle of the chin. Then, I want you to draw a line that cuts the face in half horizontally, at right about the middle of the face. Start at the middle of the left side of the face, and because the face is tilted slightly, make your line shift up (only a little) as you draw the line to the right side of the face. Draw another one, exactly the same way, just a bit above the one you just drew. These will be your guidelines for the placement of the eyes, nose, and mouth.
To draw the nose, first, look at the subject’s nose. If you look for the shapes, you can see that the nose is really only made up of a circle and two ellipses. Sketch in the bulbous part of the nose as a circle, about halfway between the bottom horizontal guideline and the chin. On either side of that small circle, sketch in two ellipses (narrow ovals). From the top of either side of the small circle, draw in the bridge of the nose with two lines. Draw these lines all the way to your top horizontal guideline, and make them spread away from each other the higher they go.

Now, for the eyebrows, copy the picture best you can, and make the eyebrows get narrower the further they get from the center of the face.
For the eyes, draw two ovals, and then two circles inside of each one. (Tip: to get the spacing right, draw a third oval in between the ones for the eyes. The general rule is that typically, you should be able to fit one eye in the center of the face between the other two.) On the inside corner of each eye, draw a tiny triangle, and connect it to your ovals. These are your tear ducts. For the eye on the left, your oval should be almost touching the eyebrow you drew.
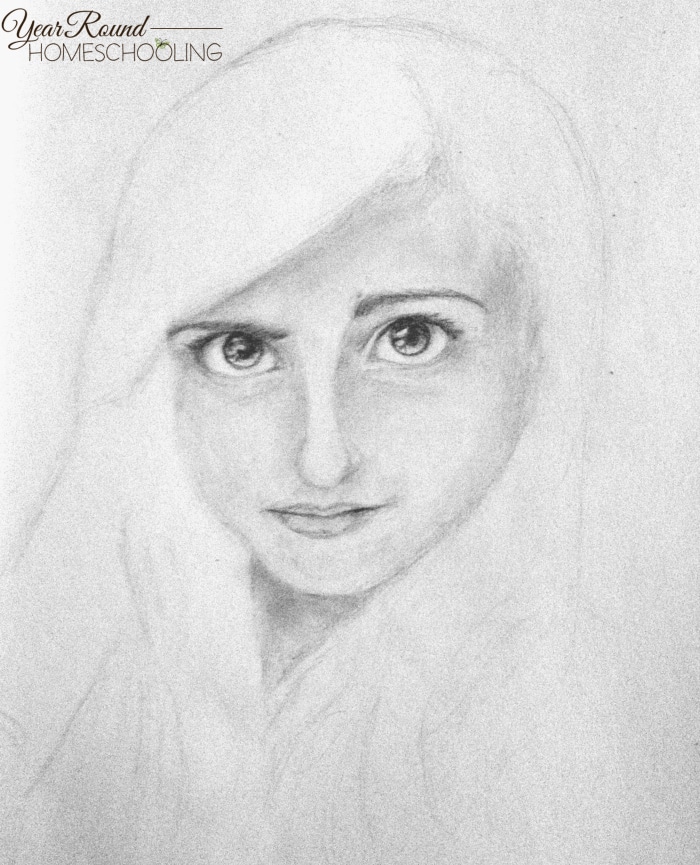
Step 3
For this step we will sketch in the outline for where the hair is. It is fairly simple, really. Don’t worry about putting in any detail at this point; just get the basic idea, just the shape of the hair. (Do you notice a theme yet?) The part in the subject’s hair is right above the middle of the eyebrow, and then you follow the natural curve of the face/neck you’ve already drawn. For the bangs, draw a curving line away from the part in the hair, and make it touch the top corner of the left eyebrow. If you wish, you can add a few guidelines in the hair for how you want it to flow.
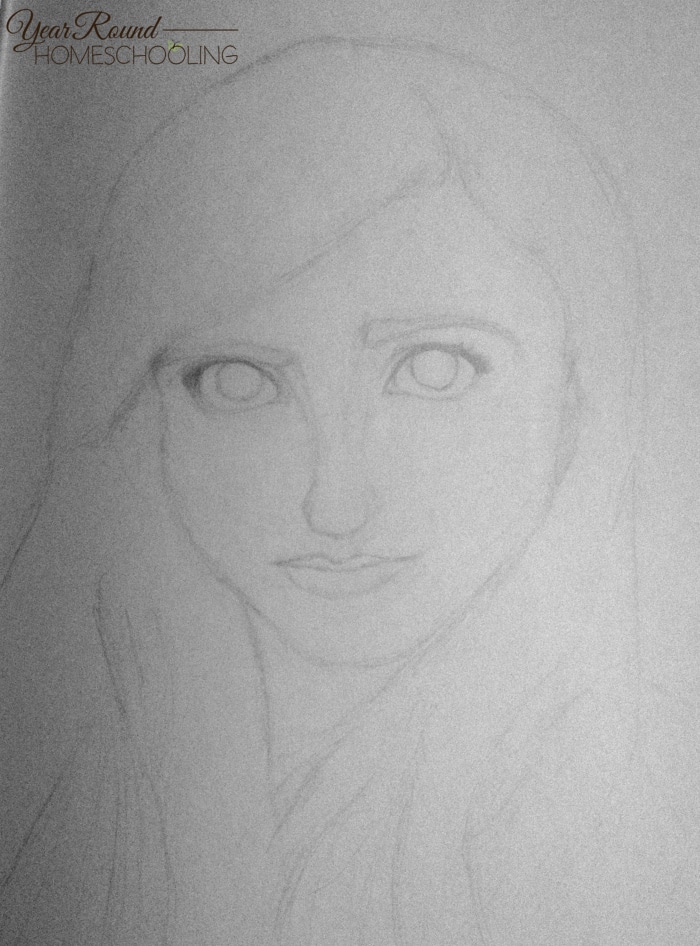
The next thing I have added in this step are the lips. If you really look at these lips, you can almost see a bow shape. Draw an upward curving line halfway between the nose and the chin. Above that, make an M shape that seems like it was stretched out—follow the photo to determine where draw the line that separates the top and bottom lip.
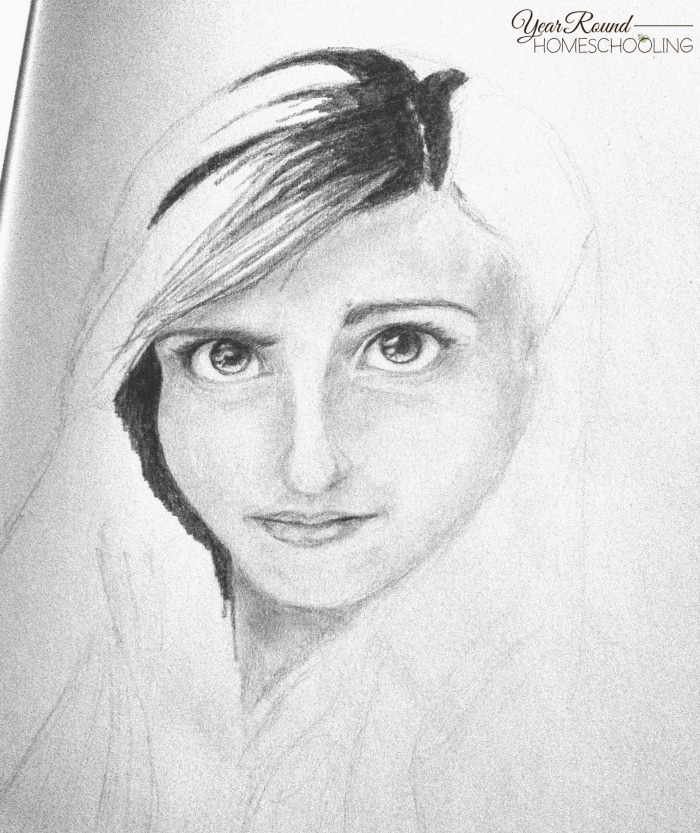
Step 4
Now this is where the drawing will start to look ugly, but don’t lose hope! It always looks quite strange in this stage, as we begin shading in the darker values of the face. What you’re going to do is look at the picture, and find the darkest areas on the face—not in the hair, only the skin right now. Just looking at the face, you can see that the darkest values are near the hairline, where the hair casts a shadow on the forehead, on either side of the bridge of the nose, and where the eyelids/eye socket areas are. Shade the neck to define the jaw line as well. Take your 4B pencil (if you have one), and shade in these areas, making it look similar to the photo below. The most shading is really on the left side of the face, as this is where the hair is casting the most shadow. On the right side of the face, notice the patch of shading that defines the face a bit more, telling you it is not a flat surface. Continue darkening these areas, but don’t shade in the eyes or the lips at this point.

Step 5
As you continue shading the darker areas of the face, start to lightly shade in the rest of the face. Make sure your strokes are very light, and use the 2B pencil for this if you have one. The face should not be too dark, but neither should any of the white paper be showing through either. Once you have completed shading in the whole face, and have a wide range of values, take an eraser and erase, very softly, on the bridge of the nose, and on each cheek’s highest point.
What I will instruct you to do next is just a personal trick that some artists don’t agree with, so you can decide for yourself whether to do it or not. Take a finger and smudge the shading you did on the face to create a smoother transition into the darker or lighter areas. This will make the subject’s skin appear more like skin, and smoother so there’s not a high contrast between light and dark on the skin. Darken in the eyebrows with strong, quick strokes, filling in the space you left for them. Using a 6B pencil, outline the top eyelids and darken the eyelashes.
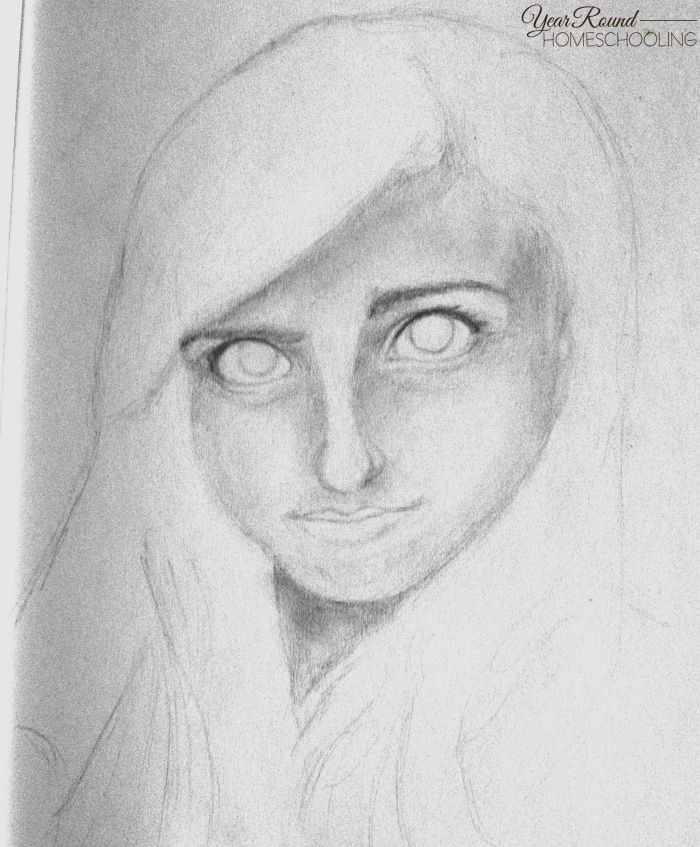
(This photo above is before smudging; the photo below in the next step is what the skin looks like with smudging).
Step 6
Now we are going to focus on the eyes and the lips, the hardest part to draw correctly. What you’re going to do first for the eyes is look at the photo and sketch (lightly!) where the highlights are in the subject’s irises. These will show you where not to shade in the eyes, so you’ll leave those spaces white. From here, darken in the pupils, and shade the top part of the iris above the pupils almost as dark as the pupil. Remembering to leave the highlights white, shade in the irises, getting lighter as you work your way down to the bottom of each iris.
Shade the whites of the eyes with light strokes, and only near the upper eyelids, just under the eyelashes.
Now for the lips, darken the areas where the top and bottom lip meet, and shade them in so it is clear where the lips begin on the face. Leave a lighter space near the middle of the bottom lip, but don’t leave it white.
Step 7
We will now move on to the hair! This is probably the most fun part of the drawing, but you must understand that when you draw hair, you’re not drawing every single strand of hair…not even hundred of them. You are drawing the contrasting values and the shapes you see, just like we did with the face.
In this step, what you need to do is take your darkest pencil (6B) and outline the darkest portions of the hair. These places would be, the top, or crown, of the head, the hair by the left side of the face, and a few other places throughout the subject’s head. Leave some areas within the places you are shading white, so that when you come back to draw the rest of the hair, you’ll shade it in a semi-dark shade.
As you can see, there are not any visible lines of hair in the darkest areas; it really is just a solid shade. Pull some of the darkest shading out into the bangs so it blends well as you start laying in a few patches of hair. Make sure when you are darkening next to the face that you make your lines sharp, so it strikes a good contrast between the darkest part of the hair, and the lightness of the face.
Step 8
Keep layering in the hair with steady strokes, and keep darkening the darkest areas. Study the picture, picking out the different contrasts and shapes within the folds of the hair.
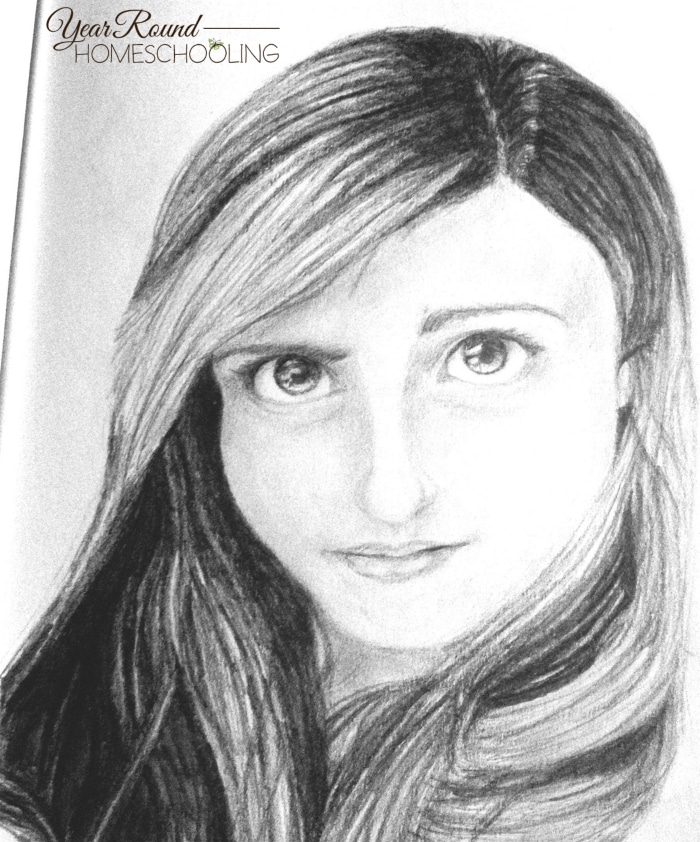
Take your time and move with smooth strokes, following the hair’s natural flow. Just behind the bangs, add a dark strip, and add a few stray hairs across the neck to give everything a more realistic feel. As you draw, make the darkest areas have a few different shades so as to add depth to the drawing.
Once you finish layering in the hair, you have successfully drawn the human face! Now go into the world and spread the drawing knowledge!
____________________
 Hailey Woerner is a young author following her dreams. She is one of those…introverted types, if you will. She finds her passion in writing, drawing, singing, and serving on her highschool worship team. Some have called her creative, intuitive, quiet, gentle, and graceful, though sometimes hot-headed. She lives in the wonderful state of VA with her family of seven, and loves watching the seasons change over the mountains. You can often find her sitting alone, thinking up new ways to tell an old tale, or creating tunes for a new song she has written, but she always welcomes conversation to those who come up to her! Just watch yourself, or she might find some way to work you into her next novel. You can follow her on her blog, Facebook.
