Cartoons are awesome right? They are lots of fun to draw and you can really get creative with this style. My son had the chance to be a part of an art camp this summer, all they studied was cartooning. Not only was he quite good at it, but he had a blast too. We also found out there are some really neat historical facts that go along with it. I always like it when I can fit a couple different subjects into one super fun thing!
It turns out that cartooning is quite historical. As we read in, 1300 BC: In Understanding Comics, Scott McCloud states that, “Comics have been with us since ancient times. Think hieroglyphics, large murals decorated with a series of images that told a story… Maybe not as elaborately as comics today but still. Did you know that the word “cartoon“ comes from cartone, the Italian word for “large paper”?
Then in the 1700’s there were those who used this art form to show action as if it were a stage play and using thought balloons, included text with a series of images. Then came the 19th century where there was zincography (etching zinc plates with a strong acid to produce a printing plate) and photoengraving, and this is when the cartoons became really popular appearing in newspapers all over the world, and ultimately gave birth to comics as we know them today and animation in film.”
Have your kids try out cartooning for themselves by drawing a cartoon pig using the steps below!
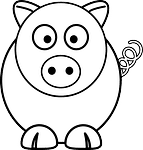
Step 1: Draw an oval for the body, then draw a circle for the head and an oval for the snout. Two nostrils in center.
Step 2: Draw the pig’s feet. Draw these using half circle like shapes, wider at the top and narrower at the bottom. Small triangles in the center of each foot.
Step 3: Two triangles on top of head are ears; a slight line to the right and the left, to show a bit of floppy ear.
Step 4: Middle of head two big circles for the eyes and then two smaller circles inside, colored in. My son likes to give his pigs blue eyes.
Step 5: Curly tail, a longer or shorter spiral.
Here are just a couple tips for while you work:
- Looking at photos is good when drawing anything!
- Trace the pencil lines you want to keep with a felt-tip pen, and erase any extra lines to make it cleaner.
- If you want to make it even more realistic or place your subject in some scenery or context, add some shadows!
- Make sure you don’t leave any stray marks!
- It really helps to point out separate shapes in the objects you want to draw; breaking the subject down into smaller pieces to work with. (this also encourages attention to detail; for bigger projects make sure that your children take breaks as they need to)
And for the fun of it, here are some fun facts about those little piggies we drew too:
- A pig cannot look up to the sky!
- Pigs are very intelligent.
- Pigs roll in the mud to cool off ; it is also a way to protect themselves against the sun.
Whatever you do be sure to have fun! The key to great art of course, is not to be afraid to use your imagination. You can be really original or totally crazy! It’s up to you to create your own style and draw a very cool pig in only a couple of minutes! Have fun!
Have your children ever tried drawing their own cartoons?
You can find more homeschool art ideas by following our Pinterest board below.
Follow Misty Leask’s board Homeschool: Art on Pinterest.
